


This is a full remix of the Fancy Hextraction Game Boards by Zack Freedman.
**Would love to see some of your prints! Thanks to those that have already uploaded photos! **
Modular Game Board remix is finished! check it out here: https://than.gs/m/972454
This remix changes lots things, features that I wanted for my game board, these include:
- Full gutters.
- Easy to print with no supports.
- Use less filament.
- Prints quicker. Compared to a full board with gutters it is all of the above, however with all the extras it may end up using more filament. But I'm not totally sure on this as I haven't bothered to do the math.
I wanted a board that was quick and easy to set up, and would pack up for travelling securely. That holds everything needed all together. (except for the tiles)
It also adds a few new things:
Full Gutters
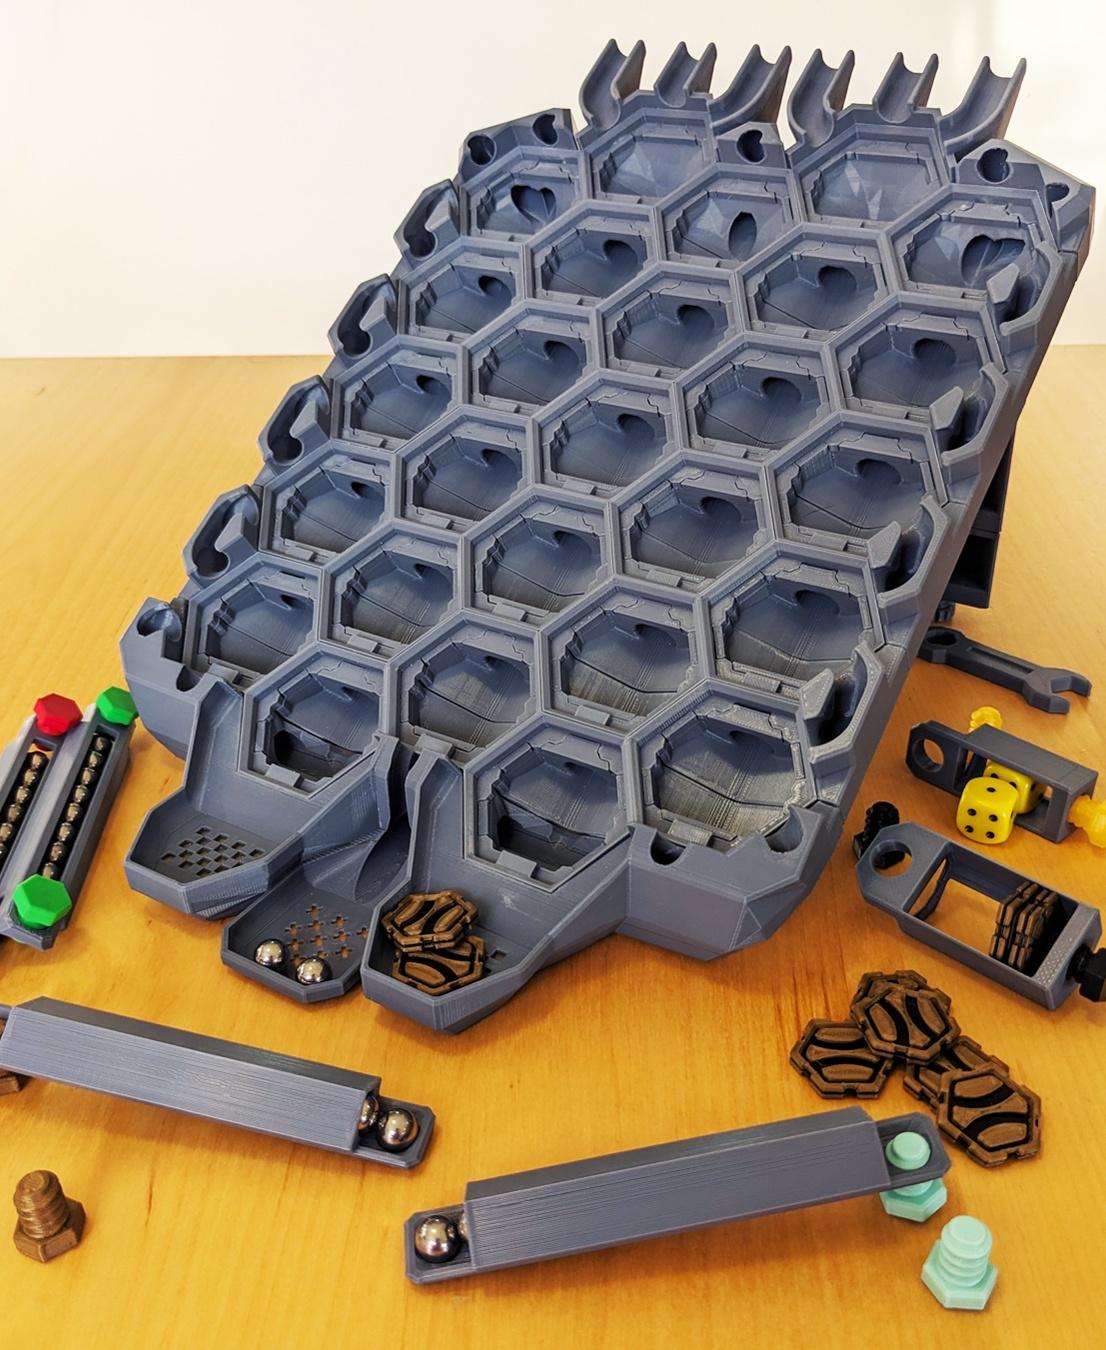
All gutters travel down a "pipe" on the outsides of the game board, and end up in the middle section in-between the two goals (see photos, the area with the crosses). This allows some tiles that pick up the ball from the play area gutters to still be used, without picking up the out of play gutter balls.
The exception to this is the top middle gutter, which funnels back into the middle channel gutter.
(Some of the photos will show an older version that funneled balls back into the 2 outermost channels)
Custom Height The standard height of the game board is 5 from on ramp to goal. With this version its easy to print any height you wish. The side gutters are modular and reversible (same file for left and right sides). For each extra row of height just print 5 extra gutters, 1 single row 5 plate and 2 side gutters. I printed a 6 high as shown in the photos, and the instructions below are for a 6 high board.
Ball Holders The ball holders are a convenient way of storing the balls. When removing from the back of the board, don't fully unscrew the bolts. Do it just enough to release it from the board and the balls will stay in the holder. They also double as a ball dispenser for each player. Fully unscrew one end, and unscrew the other end almost fully, so to act as a foot, and the balls will all roll down as you take a ball. (see photos)
Dice Holder Will fit a max size of 2x15mm dice, for single player mode. The bolt on one end serves to hold the dice in place securely, and also allows for smaller dice to be placed in it.
Coins and Holder These can be used to keep track of how many wins you have had for those that are extra competitive! Or they can be used in a new "game mode" where you place 3-5 coins in each goal. Whenever a ball goes in a goal collect as many coins as there are balls that made it into the goals this turn. This encourages multi ball plays as you get coins for all balls, from both goals, that go in that turn. Once a ball/s have entered the goal, coins have been collected, the game board is reset as usual, but with less coins in the goals. Keep playing till a player has greater than half the coins, they are the winner!
Printable Spanner While not strictly needed as finger tight for all bolts is fine. I included them as kids found it hard to do/undo the bolts without it. They are also used as a spacer in the back legs when detached and bolted to the back for travel/storage, without them the legs do not hold as securely, so I would recommend printing 2 just for this reason.
Print Settings All files are in the correct scaling and orientation recommended to print them. All parts are design to be printed easily without supports. I used 0.2 layer height, 2 perimeters and 15% gyroid infill. With the exception of the Bolts, Spanner and BackMounts that I did with 3 perimeters, and 40% infill. The main goal area (Goals.stl) is quite large and on my printer, an Ender 5, it needed to be rotated 45 degrees to fit. I have included the goals cut in half for smaller printers, then just glue the 2 halves together. However I have not printed them to see if it works.
How many to print This remix includes all the files needed except for the Plates. Grab them from the original. Or I used the plates for small printers here: https://than.gs/m/860793 If like me you wanted to print the 6 (or more) tile height version (6 tiles from On ramp to Goals) then you will also need the plate single row found here: https://than.gs/m/857242
For the 6 tile high version BackMount.stl x 16 (If not printing dice holder or coin holder use less as appropriate) BallHolder.stl x 4 - Suggestion only, each holds 9 balls and a total of 4 will be able to fit on a 6 Height board. If not using the dice or coin holders 2 more spots could be used for extra ball holders. BoltFeet.stl x 2 - I find these work better for the feet. You can use all of this type or all of the hex type, or a mix of both. BoltHex.stl x 16 - If printing everything, if not use less as appropriate. Coin.stl x 10 - Optional CoinHolder.stl x 1 - Optional GoalsFixed.stl x 1 Gutter.stl x 22 GutterHalf.stl x 3 GutterLegMount_L.stl x 1 GutterLegMount_R.stl x 1 GutterSides.stl x8 GutterTopMiddle.stl x 1 Leg.stl x 2 LegExtention.stl x 2 OnRamp.stl x 2 Spanner x 2 (While not technically needed they are used as a spacer so when the legs are screwed into the back the bolts are able to tighten correctly.)
Assembly For assembly I found it easiest to glue together in the following order.
- Depending on what configuration of plate you used, glue them together first.
- Then glue all gutters and half gutters to the base plates.
- Next glue all the side gutters on.
- Then glue the left and right leg supports, on ramps then the top middle gutter.
- Lastly the Goals.
If you printed the mounts for the legs and ball holders (BackMounts.stl) glue these in next. For these make sure that the bevel is facing outwards from the ball holders. (see photos)
- Glue the 4 on closest to the goals
- Using the ball holder, screw one end into one of the BackMounts that were just glued. Screw an un-glued BackMount into the other end of the ball mount.
- Mark out with pencil or just scratch a small mark where to line up the BackMount to. Take the ball holder off and glue the BackMount to the board lining it up with the mark you just made.
- Glue them on carefully one by one, double checking first to make sure measurements are correct.
- The next row of 4 should be 1cm above the last row, making sure the tabs are facing correctly. (see photo) Again checking carefully mark out where the last row should go by spacing it out as done for the second row.
That's it! ~ you are ready to play Hextraction!
Thanks for checking out my remix! If there are any issues let me know. This is my first time ever uploading a 3D printing file! I hope you enjoy!
This was all made and released for free! It took a lot of work, time and filament testing. So if you're feeling generous my Paypal donation link is below, and will be used to buy more filament. Anything would be greatly appreciated!
paypal.me/RichardH3D** If you downloaded prior to 9th November 2023 please read below and re download. It has come to my attention that the Goals.stl gutters are slightly too wide (by 0.45mm each side) This may cause issues with balls going down the outsides. Fixed version is now uploaded GoalsFixed.stl Please redownload if you have the old version.
If you have already printed, but not glued the goals, and don't what to re-print the full goal piece again. I have added GutterSideLeftFix.stl and GutterSideRightFix.stl. These are both adjusted so that they will line up with the old Goal.stl. Only print 1 of each and place them just before the goal. The end with the L or R should go closest to the Goal piece as that's the end I adjusted. Ignore this if you haven't printed anything yet. Only print these if you printed the old Goals.stl and do not want to re print the fixed GoalsFixed.stl version.
Sorry about that!! Worked fine for me so didn't really question it. Hopefully its a small enough amount that most who have already printed and glued should work. Perhaps a bit of force inwards on the outer two sides as you glue may be enough? However I'd just print the fixed version to be sure. Sorry again!**